Tuesday, November 29, 2011

Free Bikini Pattern

Everything you need to know about making this colour block bikini is gathered together in this post.  The hardest part will be choosing your colour combinations.  Turquoise, watermelon & sunshine yellow would be very summery.  If you are more of a bronzed beach goddess, you could combine different metallics together.  Prefer something more classic?  How about black, white & black?  I have gone with peach, copper and jade.


Get all the posts

Monday, November 7, 2011

Colour Block Bikini Tutorial - the bikini bottom

This tutorial starts with the bikini bottom at the end of the tutorial to assemble the pieces.  Really, all that is left to do is add the elastic.

Related posts


The elastic chart is shown in the pattern instructions.   Cut the elastic to length for the waist line and each leg.  Lap the ends of each piece of elastic 2cm and stitch together to form a loop.  Sometimes my sewing machine doesn't like doing this for rubber elastic, but it doesn't need to be sewn well; just enough to hold together.


Divide the loop into quarters and mark with a pen.  Do this for the waistline elastic and each of the leg hole elastic loops.
 

Pin the elastic to the waistline of the bikini bottoms.  Match one mark to the centre front, the opposite one to the centre back and the remaining marks should match to the side seams.


Stitch the elastic to the bikini bottoms using either an overlocker or a wide 3-step zig-zag on a regular sewing machine.

Now repeat this process for the elastic on the legs.  It is just a tad trickier to find the quarter points to match the elastic on the legs.  To do this, flatten a leg hole in half, matching the edges, to divide the leg hole into two.  Put a pin in each end to mark the half points. 


Refold the leg hole in two such that the half point pins are lined up with each other in the centre.  Again match the edges.  The ends of the fold should now be the quarter points.  Mark these with a pin.


Match your pen marks on the leg elastic with the pin marks on the leg holes and attach, again using either an overlocker or a wide 3-step zig-zag on a regular sewing machine.


Fold the elasticated edges to the inside and top stitch in place.  If you have a coverstitch machine, you could use this.  Otherwise, use a medium zig-zag on a sewing machine.  You want to position your stitch so that it is on the inside edge of the elastic NOT in the middle of the elastic.  This stops the elastic from rolling inwards when you are wearing the swimmers.


All your work is done now.  I will show a photo of the completed bikini in the next post.

Colour Block Bikini Tutorial - the halter top

Today we are going to complete the halter top.

Related posts

Put 2 strap pieces, wrong sides together, and stitch together.  Repeat for the other strap.  You can see that on one of the straps I have used a zig-zag stitch on a sewing machine.  For the other, I used an overlocker.

Turn the straps, right sides out.

Place a strap in the centre of the upper edge of the right side of the halter.

Place the halter lining on top, right sides facing in, sandwiching the strap in between. 

Stitch across the top edge.  Repeat for the other strap on the second halter piece.  Again, I used used a sewing machine for one and an overlocker for the other.

Turn right sides out.

Refer to the elastic chart in this post to determine the length of elastic that you need for the neckline edge and the armhole edge.

There are 2 ways that you can go about this next bit.  Either cut the elastic to length OR cut it longer and mark the length on the elastic with a pen.  If you cut it longer, you will have bits to hang onto when you stitch the elastic in place.

If you have an overlocker, serge the elastic onto the halter, through both the halter and lining layers.  You will need to stretch the elastic just a little to get it to fit.  I usually overlock with the elastic sitting on top, so I can see not to cut the edges off, but I know that other people feed the elastic underneath.  Practice both ways and see what works best for you.  I usually lengthen the overlock stitch.

If you are using a sewing machine, use a 3-step zig-zag if you have one, to attach the elastic through halter and lining.  If you don't have a 3-step zig-zag, use a normal zig-zag.  Zig-zag in the middle of the elastic, using the widest stitch that fits on the elastic.

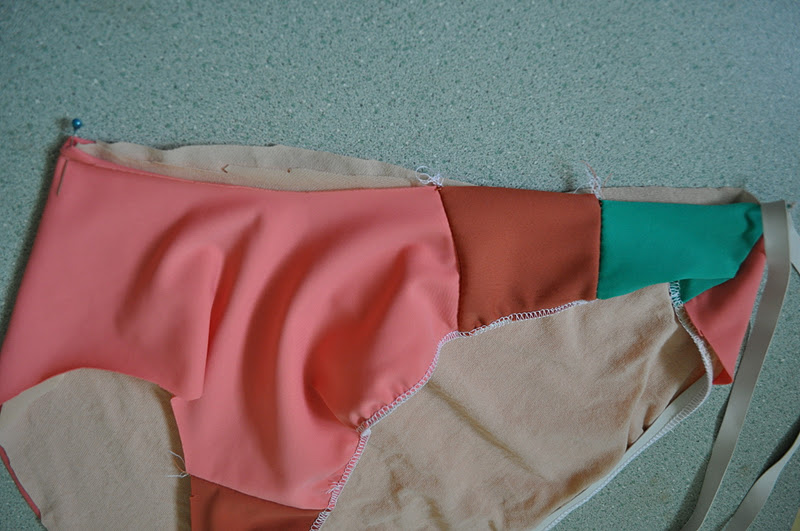
Turn the elasticated edges to the inside and stitch in place.  If you have a coverstitch machine, you could use this.  Otherwise, use a medium zig-zag on a sewing machine.  You want to position your stitch so that it is on the inside edge of the elastic NOT in the middle of the elastic.  This stops the elastic from rolling inwards when you are wearing the swimmers.  In my picture below, you can see that I have only stitched the upper piece of the halter.  This is because I wanted to change thread colour for the lower stripes, but I wanted to complete the next step before changing threads.

Use a satin stitch (dense, wide zig-zag)to secure the ends of the elastic in place.

The fully top-stitched halters are shown here.

You may wish to baste the lining to the halter pieces on the bottom edge using a zig-zag stitch.

(Since I wrote this tutorial, I have learnt a better way to do this, taking into account turn-of-cloth of the lining.  I will show this in a later tutorial, but you could read Sherry's tutorial if the bit of lining poking out annoys you!)

Fold up the casing (1.5 cm). 

Stitch the casing in place using a narrow zig-zag.  You may need to stretch the halter a little to fit the bottom edge.  this makes the seam a little bubbly, but you won't see this once the drawstring has been threaded through.

Repeat for the other halter cup.

Make the drawstring tie, using the 4 cm strip you cut from across the width of the main fabric and a length of 1 cm wide elastic cut to the same length as the fabric strip.  I have not shown tutorial steps to make the drawstring, as I have written a whole tutorial previously on making swimwear straps

Feed the drawstring through the casing of one halter cup and then the other, making sure that the neckline edges are at the centre front.  You can tie the drawsting either at the back, or between the cups at the front.  Adjust gathering along casing to fit.

Next up, applying elastic to the bikini bottoms.

Wednesday, November 2, 2011

Colour Block Bikini Tutorial - assembling the pieces

Now up to the fun bit...sewing it all together.  I have broken this tutorial into several parts, just because the post is rather picture heavy.

 Related posts

Layout the pieces as they will be assembled.  There are notches on the pattern pieces to assist you in laying them out.  If you lay them out neatly as you work, there will be less chance of putting in a piece upside down or back to front.   The bikini top uses pieces 7, 4, 5 and 6 as well as the strips cut for the tie.


The bottoms use pieces 1, 2 & 3.
 Cut out the lining pieces.

Assemble pieces 4, 5 & 6 as you have laid them out (do not attach the neck strap yet).  You can use either a narrow zig-zag stitch or an overlocker to assemble the pieces.  In this tutorial, I have tried to show both methods where possible.  The photo below shows the zig-zag stitch.  If you are concerned about the width of zig-zag to use, pull on the seam after you have sewn it, to stretch it and check that the stitched do not pop.

I can see in these photos that my peach coloured fabric has been cut wrong side out.  I can tell that because of the way the fabric is curling.  Never mind this mistake...it won't change the tutorial and the finished product is fine (just a shame I didn't notice at the time...I was trying so hard to make everything perfect!).


Lay the assembled bikini top pieces over the lining pattern to check that everything has been assembled okay.  You may want to use a stitcky dot to mark the neckline edge.  The neckline edge is straighter than the armhole edge, but it would be easy to get them mixed up.


Lay the bikini top pieces over the bikini top lining.  The lining pattern is the same size as the outer pieces.

Ideally, the lining should be a smidge smaller to allow for the turn-of-cloth when you fold the elastic in.  Different lining fabrics will behave differently, so the pattern has not been modified to allow for this turn of cloth.  You could cut the lining 1-2 mm smaller aIl the way around if you wanted a neater finish.  It should not affect the appearance of the bikini when worn, as both the outer fabric and lining are required to stretch to cover the body.

I have seen some lining fabrics relax and end up bigger than the pattern from which they were cut.  If this happens, lay the pattern over the top and cut again.


Assemble the bikini bottom pieces, again using either a narrow zi-zag or an overlocker. Lay the bikini bottom, wrong side down, on a flat surface, with the front waist uppermost.


Fold the back of the bikini bottom up over the front, so that right sides are facing in.


Fold the lining bottom in the same way, with right sides facing in (the right side is the side that touches your skin). 

Lay the lining over the bikini bottom, matching side seams.  Stitch the side seams.


This photo shows the side seam stitched.

Fold the front half of the lining to the front of the bikini bottom.  See how the seam allowances are hidden and won't be rubbing against the skin.  The lining is attached the bikini and won't slip around.  You won't need to fuss around matching seam lines.


Turn the bikini right side out.

I'll attach the elastic in the next tutorial.

Monday, October 31, 2011

Colour Block Bikini pattern details

Here we have all the extra bits of information that you might need to get started on your colour block bikini...hmmmm, beachy, summer weather is not too far away ...


Related Posts:
psst: don't have your pattern printed out yet?  Go here to get it.


Pattern # 12011

Pattern description:  Halter style bikini with colour block detailing.  The halter bikini top has a flattering neckline, wide neck strap, moderate coverage and an adjustable drawstring underbust tie.  The bikini bottoms are low slung with full coverage in the back.  The halter and bottoms are fully lined.

Fabric Requirements: swimwear fabrics with stretch in both the vertical and horizontal direction, such as nylon spandex; swimwear lining.  Both lining and fashion fabrics should have 75% stretch.  This means that 10 cm (4") of fabric should stretch to 17.5 cm (7").  When testing the stretchiness of your fabric, use a folded edge of fabric rather than a cut edge.
  • main colour (lower stripe of halter, centre panel of bottoms): 0.6 m (5/8 yard)
  • contrast 1 (halter straps, upper stripe of halter, outer panel of bottoms): 0.5 m (5/8 yard)
  • contrast 2 (middles strips of halter, middle panel of bottoms): 0.2 m (1/4 yard)
  • lining: 0.6 m (5/8 yard)
(note: you could use 0.3 m (3/8 yard) of contrast 1 if you want to cut the neck straps on the cross grain)

Notions:
  • 3.5 m  (3 7/8 yards) of 10 mm (3/8") swimwear elastic
  • polyester thread
  • stretch or ball point sewing machine needle

Sizing Chart:


Size 6 8 10 12 14 16 18
Bust (cm) 76 80 84 88 92 96 100
Hips (cm) 81 85 89 93 97 101 105


Size


Bust (inches) 29 7/8 31 1/2 33 1/8 34 5/8 36 1/4 37 3/4 39 3/8
Hips (inches) 31 7/8 33 1/2 35    36 5/8 38 1/4 39 3/4 41 3/8


Elastic Chart:

Metric
SizeNecklineArmholeWaistLegsTieTotal

Cut 2Cut 2Cut 1Cut 2Cut 1
627.0 cm27.4 cm68.6 cm49.7 cm140.0 cm276.9 cm
827.9 cm28.5 cm71.6 cm51.6 cm140.0 cm287.6 cm
1028.9 cm29.6 cm74.7 cm53.6 cm140.0 cm298.8 cm
1229.9 cm30.7 cm78.0 cm55.6 cm140.0 cm310.4 cm
1431.0 cm31.8 cm81.4 cm57.7 cm140.0 cm322.5 cm
1632.1 cm33.0 cm85.0 cm59.9 cm140.0 cm335.0 cm
1833.2 cm34.3 cm88.7 cm62.2 cm140.0 cm348.1 cm

Inches

Size Neckline Armhole Waist Legs Tie Total
Cut 2 Cut 2 Cut 1 Cut 2 Cut 1
inches inches inches inches inches yard
6 10 5/8 10 3/4 27    19 5/8 55 1/8 3   
8 11    11 1/4 28 1/8 20 3/8 55 1/8 3 1/8
10 11 3/8 11 5/8 29 3/8 21 1/8 55 1/8 3 1/4
12 11 3/4 12 1/8 30 3/4 21 7/8 55 1/8 3 3/8
14 12 1/4 12 1/2 32    22 3/4 55 1/8 3 1/2
16 12 5/8 13    33 1/2 23 5/8 55 1/8 3 5/8
18 13 1/8 13 1/2 34 7/8 24 1/2 55 1/8 3 3/4


Cutting:


Print out the pattern and tape or glue the sheets of paper together.

Choose your halter size based on the bust measurement (pieces 4, 5, 6, 7, 9).  Choose your bottoms size based on the hip measurement (pieces 1, 2, 3, 8).

Cut out the pattern pieces.  Cut away the pattern lines.  Each piece comes in sizes 6, 8, 10, 12, 14, 16 & 18.  Not all sizes are marked on the smaller pieces, but sizes 6, 12 and 18 are marked.  If you are between these sizes, just count out the number of lines to get to your size.  

Cut the following pieces in fabric.  Arrows on the pattern pieces indicate lengthwise grain.

Main:
  • 1 x piece 1 on fold
  • 2 x piece 6
  • 4 cm strip (1 1/2") across the width of the fabric, for the tie strap
-          Contrast 1
  • 4 x piece 7
  • 2 x piece 3
  • 2 x piece 4
Contrast 2
  • 2 x piece 2
  • 2 x piece 5
Lining
  • 1 x piece 8 on fold
  • 2 x piece 9

Hem and Seam Allowances:  Seam allowances are 10 mm (3/8 "), unless otherwise stated.  Elastic allowance is 10 mm (3/8").  Casing on halter top is 15 mm (5/8")

My next post will be a tutorial on making up this colour block bikini pattern.


Tuesday, October 25, 2011

Colour Block Bikini Pattern

Are you getting ready to make this bikini pattern?  Are you planning your favourite colour combos?  Today I am giving you the pattern, in sizes 6 - 18.  In a later post, I will list fabric requirements, notions etc and the size chart.  After that I will show you how easy it is to make them.  But let's not get ahead of ourselves.  First, the pattern.


(note: the first page of the downloads are blank, so don't panic when you can't see anything.  Just scroll down to the second page)

Pattern #: 12011

Download pattern suitable for printing on A4 paper. from Scribd

Download pattern suitable for printing on letter paper. from Scribd


Link to pattern on A4 paper  in google docs
Link to pattern on letter paper in google docs

The downloaded files contain 17 pages.  Discard the first page, which is blank.  Assemble pages 2 - 17 in a 4 x 4 block (pages 2,3,4,5 across the top row, pages 6,7,8,9 in the second row etc).  Note that pages 13 and 17 are blank.  Your pattern should look like this:


Tuesday, October 18, 2011

Coming soon...


Pattern and tutorial for a colour block, halter style bikini.  A fun swimsuit for summer!